If you want a quiet HF antenna that plays well with limited yard space and doesn't cost a paycheck, the delta loop antenna should be on your short list. A simple triangle of wire, fed correctly, can deliver excellent DX, low noise reception, and multiband coverage with a tuner.
This guide walks you through exactly how to build a delta loop for HF from scratch. You'll learn how to pick the right band, calculate wire lengths, choose a feed method, and tune the antenna with simple tools. If you can measure, cut, and pull wire into a tree, you can build this.
Expect to spend an afternoon planning, hanging supports, and dialing in SWR. When you're done, you'll have a rugged, efficient HF loop antenna that works for day-to-day ragchews, emergency comms, and off-grid operation.
What Is a Delta Loop Antenna?
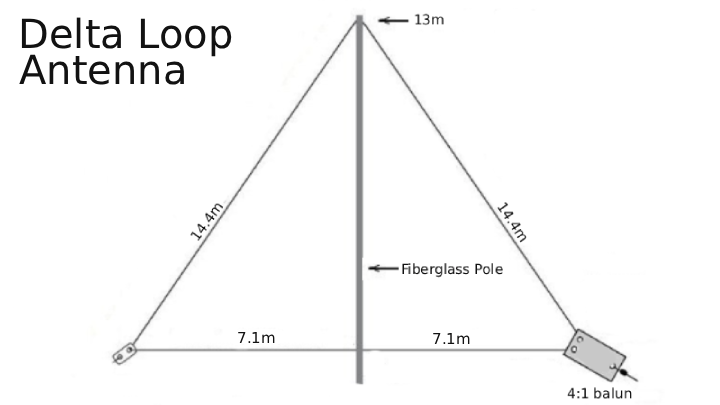
A delta loop is a full-wave loop antenna shaped like a triangle. You hang three corners, connect them with a continuous length of wire, then feed the loop at one corner or along a side. Because the loop is closed, it tends to be quieter than many verticals and dipoles in noisy neighborhoods.
For HF work, most builders start with a 40m delta loop and then use a tuner to operate on 20m, 15m, and sometimes 10m. By choosing where you feed the loop and how high you mount it, you can favor either lower-angle DX or higher-angle regional coverage.
Delta Loop Antenna Quick Facts
| Design Type | Full-wave triangular loop (delta), wire antenna |
|---|
| Typical Primary Band | 40m (can also be built for 20m, 30m, 80m) |
|---|
| Total Wire Length (40m) | ≈ 42 m / 138 ft (before trimming) |
|---|
| Feed Options | 4:1 current balun + coax, or ladder line + tuner |
|---|
| Radiation Pattern | Depends on feedpoint and height; can favor DX or NVIS |
|---|
| Noise Level | Generally lower than many verticals and random wires |
|---|
Materials Needed for an HF Delta Loop
You don’t need exotic parts to build a strong-performing HF delta loop. Most of the cost lives in the wire, supports, and feedline you choose.
Recommended Materials (40m Example Loop)
- Loop wire: 150 ft (≈ 45 m) of insulated stranded copper wire, 12–14 AWG. Popular choices:
- Flex-Weave style antenna wire (DX Engineering, Wireman, etc.)
- THHN building wire if you’re on a budget
- Supports:
- Three trees with usable branches, or
- Three fiberglass poles or mast sections (at least 9–12 m / 30–40 ft for 40m)
- Corner insulators: 3–4 UV-resistant plastic or porcelain antenna insulators.
- Rope: 100–150 ft (30–45 m) of UV-resistant dacron or paracord.
- Feedline (coax option): 50 Ω coax such as RG-8X, RG-213, or LMR-400.
- Feedline (ladder line option): 450 Ω or 300 Ω window line.
- Balun (if using coax): 4:1 or 2:1 current balun rated for your power level.
- Weatherproofing: Coax seal, self-amalgamating tape, or liquid electrical tape.
- Hardware: Stainless eye bolts, carabiners or snap hooks, cable ties, and ring terminals.
- Tuner: Manual or automatic antenna tuner with a good matching range.
Wire Length Cheat Sheet
Use these starting lengths for a full-wave HF loop antenna. Trim during tuning.
| Band | Center Frequency | Starting Length (ft) | Starting Length (m) |
|---|
| 80 m | 3.6 MHz | ≈ 280 ft | ≈ 85.3 m |
| 60 m | 5.3 MHz | ≈ 190 ft | ≈ 57.9 m |
| 40 m | 7.1 MHz | ≈ 138 ft | ≈ 42.1 m |
| 30 m | 10.1 MHz | ≈ 97 ft | ≈ 29.6 m |
| 20 m | 14.2 MHz | ≈ 69 ft | ≈ 21.0 m |
Tools Required
You can build a delta loop in a basic home workshop. Here’s what you’ll actually use.
Essential Tools
- Measuring tape (at least 50 ft / 15 m)
- Wire cutters and wire strippers
- Soldering iron and solder (for feed connections)
- Pliers and side cutters
- Adjustable wrench or socket set
Measuring & Testing Tools
- Antenna analyzer (RigExpert, NanoVNA, MFJ, etc.) or
- Transceiver with built-in SWR meter plus low-power setting
- Portable mast or painter’s pole (for test setups)
Optional but Helpful
- Throw line and weight for launching rope into trees
- Safety glasses and work gloves
- Portable ladder (if you’re working below 10–12 ft)
Preparation: Planning, Safety, and Site Layout
Before you cut wire or fling a throw weight into the nearest tree, take ten minutes to plan your loop. Good planning removes half the frustration from HF antenna projects.
Check Your Space and Supports
- Walk your yard and identify three potential support points.
- Visualize a triangle between them. Avoid power lines, metal roofs, and direct contact with other antennas.
- Make sure you can safely reach tie-off points without sketchy ladder gymnastics.
Decide on Your Feedpoint
For most builders, feeding the loop at a lower corner is easiest. It keeps the balun or ladder line near arm’s reach and allows quick access for retuning and troubleshooting.
Safety Considerations
- Stay far away from overhead power lines — if you have to ask “is this too close?” then it is.
- Warn family members or neighbors before you start throwing weights into trees.
- Keep metal ladders away from energized equipment.
Step-by-Step: Building a 40m Delta Loop for HF
These steps focus on a 40m HF delta loop antenna, but you can apply the same process to other bands. Just change the wire length and support spacing.
1. Calculate and Cut the Loop Wire
Use the classic loop formula:
Length (ft) ≈ 1005 ÷ frequency (MHz)
For example, targeting 7.1 MHz:
- 1005 ÷ 7.1 ≈ 141.5 ft
- Start with about 138–142 ft (42–43 m) and plan to trim slightly.
Measure the wire on the ground and add at least 1–2 ft (0.3–0.6 m) extra for connections and tuning.
2. Install Corner Insulators and Ropes
Attach an insulator to each planned corner support. If you’re using trees, tie a rope through the insulator and run it over a branch so you can raise or lower the loop later.
- Top apex: 30–40 ft (9–12 m) high if possible.
- Lower corners: 8–15 ft (2.5–4.5 m) high to keep it safely out of reach.
3. String the Loop and Form the Triangle
Starting at your chosen feedpoint corner, thread the wire through the first insulator, across to the top apex, down to the opposite lower corner, then back to the feedpoint location.
- Leave both ends of the wire hanging at the feedpoint corner.
- Don’t over-tighten yet; you’ll need slack for tuning and adjustments.
4. Choose and Install the Feed System
You have two main ways to feed a delta loop:
- Balanced feed (ladder line): Connect each loop end to one side of the ladder line. Run the ladder line to a balanced tuner or a 1:1 current balun at the shack, then to your tuner and radio.
- Coax feed with balun: Join the loop ends at the feedpoint and connect them to the balanced side of a 4:1 current balun. Attach coax to the unbalanced side of the balun and run it to your shack.
If you operate in noisy urban environments, the ladder line + balanced tuner approach often gives the quietest receive and easiest multiband matching.
5. Add Strain Relief and Weather Protection
Don’t let the feedpoint hardware hold all the tension. Use rope or a small loop of wire to carry the mechanical load, and let the electrical connection float on that support.
- Crimp or solder ring terminals to the loop wire ends.
- Attach them to the balun or ladder line using stainless hardware.
- Wrap exposed joints with electrical tape and then coax seal or self-amalgamating tape.
6. Raise, Shape, and Tension the Loop
Hoist the apex rope until the top corner reaches its planned height. Then tension the lower corners so the loop becomes a clean triangle without sharp kinks in the wire.
- A little sag is normal and actually helpful in the wind.
- Keep the loop away from metal gutters, towers, or other conductive objects.
7. Perform the First SWR Sweep
Connect your analyzer or low-power radio and tuner. With the tuner bypassed if possible, sweep the band where you expect resonance.
- If the resonant dip is below your target frequency, the loop is too long.
- If the dip is above your target, the loop is too short.
Don’t worry about a perfect 1:1 SWR yet; you’re just trying to land the resonance somewhere inside the band.
8. Trim (or Lengthen) the Loop Evenly
To keep the shape balanced, trim small amounts of wire from both ends at the feedpoint, then reattach. Work in small steps: 4–6 inches (10–15 cm) at a time on 40m.
- Re-measure SWR after each change.
- Stop trimming once the resonant point is in the lower third of the band you care about most (for phone or CW).
9. Check Harmonic Bands with the Tuner
With the loop resonant on 40m, engage your tuner and test 20m, 15m, and 10m.
- A good HF delta loop will usually match easily on 20m and 15m.
- 10m may require more tuner range but is often usable for digital and SSB when the band is open.
10. Finalize the Installation
Once you’re happy with the tuning:
- Lock down all knots and tie-offs.
- Double-wrap weatherproofing on exposed connections.
- Label the coax or ladder line at the shack end (“40m Delta Loop”).
Testing and Verifying Your Delta Loop
With the loop in the air, it’s time to confirm that your new HF loop antenna behaves the way you expect.
Initial Bench Tests
- Start with low power — 5–10 W — and check SWR on the primary band and harmonics.
- Feel the balun and connections after a short transmission; they should stay cool.
- Listen on your usual local nets to compare noise level against any existing dipole or vertical.
On-Air Performance Checks
- Join a regional net and ask for honest signal reports compared to your previous antenna.
- Use FT8, WSPR, or PSK Reporter to see where your signal is landing with modest power.
- Log reports so you can compare future adjustments.
Troubleshooting Common Issues
- High SWR across the band: Check all connections, confirm you really have a full loop (no open joints), and verify the balun ratio.
- Tuner struggles on harmonic bands: Consider moving to ladder line feed or raising the loop higher.
- Noise still seems high: Add a 1:1 current choke at the shack end of the feedline and ensure grounds are solid.
Results and Performance: What to Expect
A well-built HF delta loop antenna holds its own against much more expensive commercial antennas. It won’t magically erase bad propagation, but it will give you a solid, repeatable signal.
Realistic Performance Expectations
| Band | Use Case | Typical Experience |
|---|
| 40 m | Nighttime DX and regional nets | Strong, stable signals with good low-angle radiation when mounted high |
| 20 m | Daytime DX and general contacts | Excellent all-around performance using harmonic resonance |
| 15 m | DX when the band is open | Very effective with a tuner; often outperforms small verticals |
| 10 m | Local and sporadic E | Usable with tuner; more sensitive to height and feedline losses |
Compared to many end-fed wires, delta loops are usually quieter on receive. That matters if your station sits under a nest of power lines and consumer electronics.
If you’re building for emergency communications or off-grid HF, the loop’s efficiency and relatively low noise floor make it easier to copy weak stations on low power. Combine it with a reliable tuner and a battery-friendly radio and you have a strong, repeatable HF system.
Deployment Variations and Upgrades
Once you’ve built one loop, you’ll start seeing creative ways to tweak and improve it.
- Side-fed vs corner-fed: Feeding at the middle of a side can change the pattern and sometimes improve local coverage.
- Vertically oriented delta: Apex at the top, feed at a bottom corner gives a more DX-friendly low-angle pattern.
- Horizontal apex: Rotating the triangle or lowering it can favor NVIS for close-in emergency work.
- Multi-band ladder line feed: For serious experimenters, feed the loop with 450 Ω line to a balanced tuner and treat it as a “do a bit of everything” antenna.
For more antenna experiments and radio projects, take a look at the main Radio section or explore additional builds under Tech. If you’re planning a field station with digital links, pairing an HF loop with a low-power Meshtastic node makes a very capable portable package.
Frequently Asked Questions — Delta Loop Essentials
Is a delta loop better than a dipole?
"Better" depends on what you want. A well-placed dipole is still hard to beat, but a delta loop often has a lower noise floor and can be easier to fit in awkward lots. Loops also tend to be more forgiving when you run low power or portable.
Can I use a delta loop for portable operations?
Yes. Many operators run portable HF delta loops with fiberglass masts and lightweight wire. You can pitch it like a triangular tent using guy ropes and tear it down when you leave the site.
Do I need a tuner?
If you build the loop for a single band and feed it correctly, you can sometimes run without a tuner. But if you want multiband operation — especially 40/20/15 m — a tuner makes life much easier.
How much power can a delta loop handle?
The loop itself can usually handle far more power than your typical 100 W rig. The real limits are the balun, feedline, and any hardware at the feedpoint. Build your balun and feed system to match your maximum planned power and check for heating during early tests.
What if I can't get three supports?
You can still run a delta loop with two supports and one ground stake, or by using a single tall mast with the lower corners anchored to the ground. The radiation pattern will change slightly, but the antenna will still work well.
Why a Delta Loop Belongs in Your HF Playbook
Building a delta loop for HF gives you a rugged, efficient antenna that doesn’t depend on commercial marketing hype. You’re trading a few hours of wire work and knot tying for years of reliable operation, low noise reception, and strong DX potential.
Use this design if you want a station that keeps working when noisy switch-mode gadgets and sketchy mains power try to ruin your fun. A delta loop antenna pairs perfectly with off-grid power, battery operation, and emergency communications kits, yet it still shines as your everyday home antenna.
From here, your next steps are simple: measure your yard, pick a primary band, and start hanging wire. Once you hear how quiet the loop is compared to many verticals and random wires, you’ll understand why so many operators keep at least one loop in their permanent toolkit.
References & Further Reading
- ARRL Antenna Book — sections on loop antennas and multiband operation.
- Online HF modeling resources using NEC-based tools for exploring loop heights and patterns.
- Local club build nights and field days for real-world comparisons with dipoles, verticals, and other loop designs.