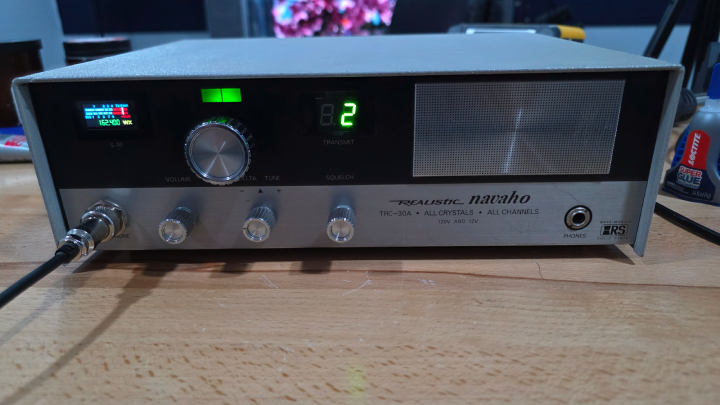
This classic CB radio was dead. Not “maybe it needs a recap” dead. It was the kind of dead where the sane move is to take what you can for parts and stop wasting time. I did not make the sane move. I opened it up, pulled the original guts, and decided the shell was too good-looking to give up on. If the old brain wasn’t coming back, I was going to give it a new one. So that’s what this is: a Realistic Navajo shell with a modern heart transplant. A classic face with CB900 Pro guts inside. It’s alive, and I’m calling it the Realoddity.
I’ve always liked vintage radios for the same reason people like old cars. The styling is bold, the controls make sense, and everything has that “built to last” attitude. A lot of modern gear is great, but it’s also kind of… disposable-feeling. I wanted a radio that still looks like it belongs in a 1970s base-mobile setup, but works like something you’d actually want to use today. That’s the whole mission behind this build.
The donor: CB900 Pro guts in a Navajo shell
The Radioddity CB900 Pro was the perfect donor because it already has the features I care about. The display is clean. The controls are modern without being annoying. And it has weather band, scanning, and a menu system that doesn’t make you want to throw it across the room. Once I decided the donor, the rest was just figuring out how to hide all that modern capability inside a faceplate that was never designed for it.
The display swap: replacing the SWR meter
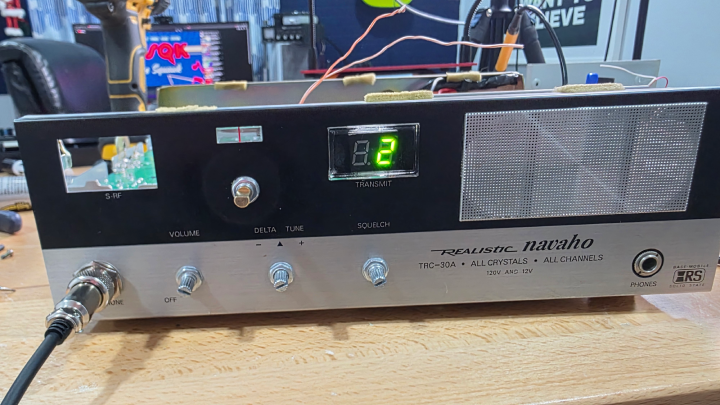
The coolest part of the CB900 Pro is the LED screen, and I wanted it on the front of the radio where you actually look. The problem is, the Navajo doesn’t have a spot for a modern display… unless you make one.So the SWR meter came out. In its place, the CB900 Pro LED screen went in. That one decision basically defines the whole radio. It still looks classic at a glance, but then you notice the display and you realize something weird is going on.
The control trick: push the tuning knob for menus
One thing I didn’t want to lose from the CB900 Pro was the way the tuning knob works. Push it in and you’re in the menu. Spin to move through options. Hold it to back out. That’s the kind of modern usability I actually like, because it doesn’t add clutter and it kept me from doing the thing I hate most on “mods” like this, adding random buttons in random places. The front panel still looks like a Realistic, but you can get to all the CB900 features without turning it into a spaceship.
Reusing the old indicator windows for modern status
The original front panel has those little windows and labels that were meant to tell you what the radio is doing. I didn’t want any of them to become dead plastic, because once something looks “unused,” the whole illusion falls apart. So I moved the receive/transmit indicator to where the channel number used to be. Now it’s green on RX and red on TX, which is honestly way more useful than the original. Then I put the digital channel readout where the old modulation/receive area was. Same general layout, just updated. It still looks like it belongs there, which was the whole point.
Splitting volume and squelch like the original
The CB900 Pro puts volume and squelch on one shaft. The Navajo doesn’t. And I like the Navajo layout. So I split them. That meant swapping in new pots so volume stays on its own control, and squelch stays on its own control, where your hand expects them to be. If you’ve ever used one of these older rigs, you know how much muscle memory matters. The squelch side has a nice bonus too: if you roll it all the way down, it kicks into auto-squelch. It’s one of those features you don’t think you need until you’ve used it a few times.
Weather band without adding an obvious switch
Weather band was non-negotiable. I wanted that feature, but I wasn’t about to drill the faceplate and slap a toggle switch somewhere ugly. So I hid it in a way that feels like something the factory might have done. I used an RF gain pot with an on/off switch built into it, then wired that switch to a relay inside. Turn the knob all the way off and it flips the radio into weather mode. The best part is it doesn’t scream “mod.” It just feels like a weird, old-school feature the radio always had. And yes, I listened to weather radio the second it worked. I can’t explain it, but it’s weirdly comforting.
Mic upgrade, scanning, and the headphone jack
The old mic jack went away and the CB900 Pro mic setup came in. I wanted the modern mic because the channel up/down buttons are actually useful, and they make scanning easy. Set the squelch, hold the button until you hear the beep or see the dot on the display, and it starts scanning. It’ll stop when it finds activity, or you can kill it by hitting PTT. Simple, and honestly… kind of addictive when you’re just listening around. I also wired the headphone jack so plugging in headphones mutes the internal speaker. It’s not “audiophile,” but it works exactly like you want it to work when you’re trying not to blast the room.
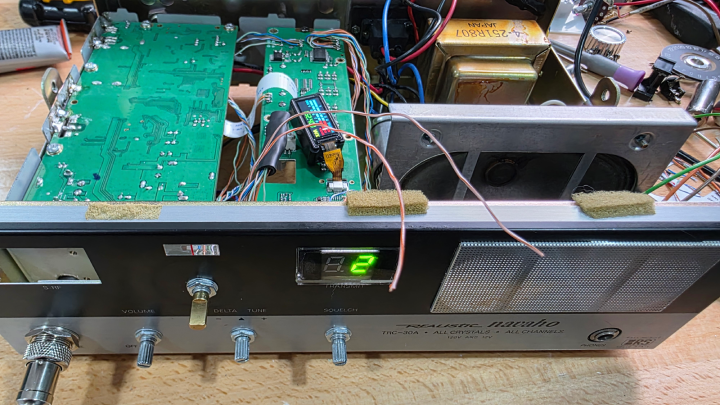
Inside the build: cramped space, lots of little problems
Parts List
- Potentiometers — for splitting volume and squelch onto separate controls, and adding the RF gain knob with built-in on/off switch for weather band.
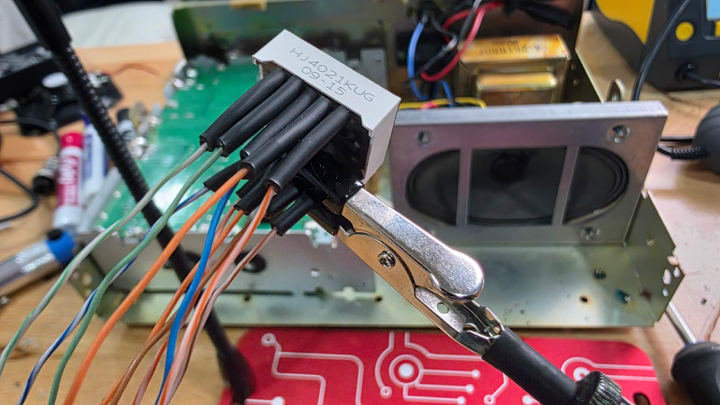
- 8-Pin Extension Connector — needed to relocate the CB900 Pro LED display from its original board position to where the SWR meter used to live.
- Cable 8 Pin 0.5mm Pitch — the ribbon cable that runs between the display extension connector and the main board.
- 12V Relay Module — wired to the RF gain pot's on/off switch to flip the radio into weather band mode without adding an external toggle.
Once the original guts were out, I decided to keep the original power supply and speaker. Partly because it felt right, and partly because I didn’t feel like re-engineering everything if I didn’t have to. Keeping those parts meant space was tight. Like, “every millimeter matters” tight. But I was still able to mount the boards inside, keep the chassis for mounting and heat sinking, and get everything bolted down solid. I also wanted to reuse the original antenna connector. That meant running coax from the original connector location back to the CB900 connection point. It’s one of those little details that no one sees, but it made the whole thing feel more “authentic” to me.
Some of the most annoying work was the small stuff. I removed the old channel indicator, mounted it in a new location, and ran jumper wires to make it behave. The LED display relocation was its own mini project too, because I needed the right jumper cable and extender board to mount it where the SWR meter used to live. And then there are the knobs. I really wanted to keep the original knobs, so I mounted them on the new shafts. I did have to trim the shafts down so everything sits closer to the faceplate and doesn’t stick out like a cheap retrofit. Those are the details that make the radio feel “real” instead of looking like a science fair project.
Frequently Asked Questions
What radio did you put inside the Realistic Navajo shell?
I used the guts of a Radioddity CB900 Pro and transplanted the boards, display, and controls into the Realistic Navajo chassis while keeping the front panel looking as original as possible.
How did you keep the front panel looking original?
I reused the original knobs, kept the original control layout, and repurposed the existing indicator windows. The biggest visible change is the CB900 Pro LED screen, which I mounted where the SWR meter used to be.
How did you add weather band without adding a new switch?
I used a pot with an on/off switch and wired it to a relay. Turning the knob fully off flips the relay and switches the radio into weather mode internally.
Why split volume and squelch onto separate knobs?
The CB900 Pro puts volume and squelch on a single shared shaft, but the original Realistic Navajo had them on separate controls. Splitting them back out keeps the layout authentic and matches the muscle memory anyone who used these old rigs already has. Squelch all the way down also kicks into auto-squelch as a bonus.
Did you keep the original power supply and speaker?
Yes. The original Realistic Navajo power supply and speaker were both reused. That made the chassis feel more authentic and saved having to re-engineer parts that already worked, but it also made internal space very tight and forced careful planning of where the CB900 Pro boards could fit.
Should I try this with my own dead vintage CB?
If the radio is truly dead and the shell is too good to scrap, a transplant is a fun way to keep the look without fighting an unfixable circuit board. Plan for tight spaces, keep the original knobs by trimming new shafts, and accept that some compromises are part of the project. It is reckless in the best way.
So… did I fix it, or build a monster?
I ended up with a classic-looking rig that has a modern brain and modern behavior. It still has the Navajo vibe, but it runs like a CB900 Pro because, under the hood, that’s exactly what it is.
- LED screen mounted where the SWR meter used to be
- RX/TX indicator repurposed into a clear red/green status light
- Separate volume and squelch controls like the original layout
- Weather band toggled with a hidden on/off pot + relay
- Modern mic features like channel scan and up/down
So yeah… it’s alive. And if you’ve got a dusty old radio sitting on a shelf, consider this your sign to do something reckless with it.
Want to build your own “modern brain in a classic shell”?
🔗 Grab the Radioddity CB900 Pro right here