If you have an RTL-SDR and you have ever watched those beautiful NOAA or Meteor M2 weather images go by on Twitter and forums, this project is for you. With a simple V-dipole antenna made from basic hardware store parts, you can be pulling live images from space in a single afternoon, without wrestling a complicated QFH build.
The classic advice for NOAA and Meteor reception is to build a QFH or turnstile for circular polarization. Both work great, but they are not exactly beginner friendly. Getting the phasing, spacing, and symmetry right can be frustrating if you do not have a workshop and test equipment.
The V-dipole takes a different angle. By bending a simple dipole into a wide horizontal V and pointing it north-south, you shape the pattern so it looks up at the sky where the satellites actually are. As a bonus, the horizontal polarization rejects a big chunk of your local vertically polarized noise sources, which is great news if you live under a forest of repeaters and FM broadcast towers.
Why a V-dipole works so well for 137 MHz weather satellites
At first glance it feels wrong to use a linearly polarized antenna for a circularly polarized signal. In theory you give up about 3 dB compared to a perfect circular match. In practice, the V-dipole trades that small loss for a bunch of real world gains that matter more on the waterfall.
V-dipole vs common beginner setups
| Metric |
V-dipole + LNA |
Why It Matters |
| Local noise rejection |
Up to ~20 dB better on vertical signals |
Horizontally polarized antenna reduces overload from FM, pagers, and business radio near 137 MHz. |
| Build complexity |
Simple hand tools, few parts |
No tricky phasing harness or curved PVC needed like a QFH, so more people can get good results. |
By bending the elements into a V of roughly 120 degrees and keeping them horizontal, the main lobe of the antenna points up instead of out at the horizon. When you then align the spine of the V north-south, that lobe sweeps across the typical paths that NOAA and Meteor satellites use as they move north-south across the sky.
The other big win is polarization. Most local services around 137 MHz are vertical. The V-dipole is horizontal, so many of those strong locals land 20 dB down. That means the front end of your RTL-SDR has an easier time and you do not have FM and pager junk splattering across the pass. Circular antennas only buy you a few dB of rejection here, which is why this simple linearly polarized trick is so appealing.
Designing your V-dipole for 137 MHz
Weather satellites in the NOAA and Meteor families transmit close to 137 MHz. That means we can design a dipole around a center frequency in the middle of the band, then tilt it into a V. This is not a precision contest. Being in the ballpark and mounted in a clean spot matters more than chasing millimeters.
Typical V-dipole design targets for NOAA and Meteor
| Metric |
Typical Value |
Why It Matters |
| Center frequency |
137.5 MHz |
Sits between NOAA APT and Meteor M2 LRPT channels, so both are covered with one antenna. |
| Element length (each side) |
About 51–53 cm |
Rough quarter wavelength at 137 MHz; close enough for good SWR when used as a V-dipole. |
How to build the V-dipole in about 30 minutes
You do not need a machine shop for this project. A hacksaw, drill, and a bit of patience will get you from pile of parts to first pass very quickly. The steps below stick to common materials you can find at a hardware store or online.
- Step 1: Pick a center frequency near 137.5 MHz and cut two equal metal elements to a quarter wave (around 51–53 cm each).
- Step 2: Drill or clamp the elements to a small nonconductive hub so they form a wide horizontal V of about 120 degrees.
- Step 3: Attach the coax: center conductor to one element, shield to the other, strain relieve the cable, and mount the V on a mast or tripod pointing north-south.
Materials and tools checklist
Here is a quick shopping list to get your V-dipole and front end built. If you already have an RTL-SDR from another project on your SDR experiments, you are halfway there.
- Two pieces of aluminum or copper tubing, rod, or thick wire (at least 55 cm each before trimming).
- One small nonconductive plate or block to act as the hub (PVC, cutting board scrap, or a 3D printed part).
- Coaxial cable from the antenna to your shack, plus connectors for your RTL-SDR.
- Mounting hardware: PVC mast, camera tripod mount, or whatever you use for other portable antenna builds.
- RTL-SDR Blog Wideband LNA to sit at the feedpoint.
- RTL-SDR dongle and computer running your favorite SDR and decoding software.
Cutting, bending, and wiring the antenna
Start by cutting the two elements slightly long. For 137.5 MHz, aim for 53 cm, then you can trim a bit if you want to nudge the resonance. Many people never bother trimming and still get great images, so do not get stuck here.
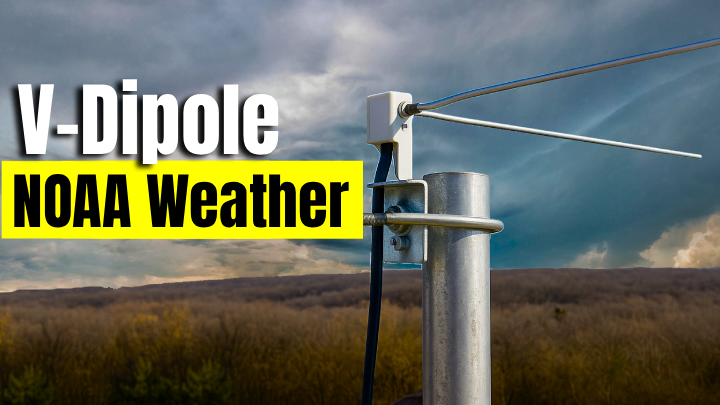
At the hub, mount the two elements so they form a shallow V. Around 120 degrees between the arms is a good target. Keep the arms level and mirror each other. One arm connects to the center conductor of the coax, the other to the shield. You can do this with ring terminals and screws, with a terminal block, or by soldering directly if your material allows it.
Use Rabbit Ears Instead
If you’ve got an old telescopic "rabbit ears" TV antenna buried in a drawer somewhere, that actually works great for this project. Each ear becomes an adjustable quarter wave element, and you can simply extend them to roughly the right length and lock them in place.
Mounting and aiming the V-dipole
Once the electrical part is done, you need to get the antenna into clear sky. Weather satellites do not care about your trees and roof, but your signal certainly will. Higher is usually better, as long as you do not create a safety problem.
Mount the V so the arms are horizontal. The point of the V should roughly sit over the mast. Rotate the entire assembly so the spine of the V runs north-south. When a NOAA bird sweeps overhead, its track will cross right through the strongest part of your pattern.
Feeding the V-dipole with the RTL-SDR Blog Wideband LNA
With a bare V-dipole and a short run of coax you can receive strong NOAA passes. The problem is that most of us do not have short coax runs or perfect RF environments. This is where a dedicated low noise amplifier right at the antenna feedpoint makes a huge difference.
The RTL-SDR Blog Wideband LNA is a great match for this project. When you place it right at the antenna, before the coax, it boosts the tiny satellite signal while the noise from your coax and shack stays where it is. The result is a much cleaner signal hitting your RTL-SDR. This also helps fight strong nearby FM and pager signals that sit just below 137 MHz, since the LNA is designed to stay linear and behave around those troublemakers.
What the V-dipole pattern looks like in practice
On paper, a straight dipole has a donut shaped pattern, loud at the horizon and quiet off the ends. Bending it into a V at 120 degrees and keeping it horizontal steers a lot of that energy upward. You get a kind of figure eight pattern in the sky, with strong lobes in front of and behind the V.
Because polar orbit satellites run roughly north-south, aligning the V north-south means those lobes sweep across the entire pass. You will notice that signals are strong from the time the satellite clears the local clutter all the way through high elevation, then fade gracefully as it disappears.
Comparing the V-dipole to other beginner antennas
You have a few common options for first weather satellite antennas: stock scanner antennas, basic verticals, V-dipoles, and more complex circular designs like QFH and turnstiles. Each has tradeoffs.
- Scanner whip or discone: very convenient, but usually too low and too omnidirectional, with little rejection of local QRM.
- Simple vertical half wave: good for many services, but not shaped for overhead satellites and aligned with local vertical noise.
- QFH or turnstile: excellent when built well, but build quality is critical, and they take time and space.
Performance expectations: what your images will look like
On a strong overhead NOAA pass, a V-dipole plus the RTL-SDR Blog Wideband LNA will give you solid copy from horizon to horizon, with the middle of the pass often sitting 20 dB or more above the noise floor. That means APT decoders can draw clean coastlines and fronts instead of stripy messes.
Meteor M2 uses digital LRPT, which is pickier about signal quality. With the V-dipole pattern and low noise front end you should see few dropped packets on good elevation passes. You will still have the occasional glitch when the satellite dips behind trees or buildings, but the overall noise floor will be much lower than with a generic vertical.
Safety and weatherproofing notes
Treat this build like any other outdoor antenna project. Do not mount your V-dipole anywhere near power lines, and do not climb on roofs without proper fall protection and a helper. A V-dipole on a camera tripod in the backyard is often enough, and much safer, for getting started.
Weatherproof any exposed connections at the feedpoint. Self amalgamating tape, coax seal, or even layers of electrical tape plus a small plastic cover go a long way. The RTL-SDR Blog Wideband LNA should be kept out of direct rain if possible, inside a small enclosure or weatherproof box mounted to the mast.
Practical tips for reliable passes and clean images
Once the hardware is up, the rest of the job is timing and software. If you already follow tutorials on SDR and decoding, this will feel familiar, just with satellites instead of repeaters.
- Use satellite tracking software to plan your sessions so you focus on higher elevation passes first.
- Let your RTL-SDR warm up and check that the bias tee is powering the RTL-SDR Blog Wideband LNA before the satellite rises.
- Record IQ or audio for the whole pass, then replay and experiment with different decoding settings to squeeze the best image quality out of your signals.
Frequently Asked Questions
Do I really need a special antenna for NOAA and Meteor weather satellites?
You can sometimes hear NOAA APT with a scanner antenna, but a purpose-built V-dipole aimed at the sky gives you far stronger and more consistent signals. The shaped pattern focuses gain where the satellites are, and the horizontal polarization reduces strong local interference that often crushes weak satellite signals on 137 MHz.
Why does the RTL-SDR Blog Wideband LNA help so much for weather satellite reception?
Putting a low-noise amplifier like the RTL-SDR Blog Wideband LNA right at the antenna feedpoint boosts the satellite signal before it runs down a long coax. That improves signal-to-noise ratio and keeps weak passes above the noise floor, while its filtering and linearity help the RTL-SDR handle nearby FM broadcast and pager signals without overloading.
Is a V-dipole worse than a QFH or turnstile for NOAA and Meteor?
A good QFH or turnstile gives you circular polarization, which matches the satellites, but they are harder to build correctly. The V-dipole is linearly polarized and technically loses about 3 dB, but the sky-focused pattern and 20 dB reduction of vertically polarized local noise often make up the difference. For many home stations, the simple V-dipole plus a low-noise amplifier is the easiest path to clean images.
Can I build the V-dipole from cheap wire instead of tubing?
Yes. Tubing makes a tidier antenna, but plenty of working V-dipoles have been built from thick house wire, copper ground wire, or even old rabbit-ear telescopic elements. The important things are that the arms stay stiff, sit in the same horizontal plane, and form a shallow V of roughly 120 degrees.
Do I need to worry about SWR on a 137 MHz V-dipole used only for receive?
Not much. For receive only at 137 MHz, getting close to a quarter wave per arm is plenty good. A small mismatch costs a fraction of a dB, and the gain you pick up from the sky-focused pattern and a feedpoint LNA easily covers it. Save SWR meter time for transmitting antennas.
Where should I mount the RTL-SDR Blog Wideband LNA in this build?
Right at the antenna feedpoint if you possibly can. The closer the LNA sits to the V, the less satellite signal you lose in coax before amplification, and the more you benefit from its low noise figure. Power the LNA over coax with a bias tee from your RTL-SDR, and weatherproof the enclosure if it lives outside.
Is a V-dipole the right first weather satellite antenna for you?
If you want to see real live weather images from space without building a complicated circular antenna, the V-dipole is a very friendly starting point. With a handful of parts, basic tools, and an RTL-SDR you probably already own, you can have a proper 137 MHz antenna tuned for NOAA and Meteor up in an afternoon.
- A simple V-dipole pattern puts gain where the satellites are instead of at the horizon.
- Horizontal polarization and the RTL-SDR Blog Wideband LNA work together to fight local noise and overload.
- The build scales: start on a tripod in the yard, then move to a permanent mast once you are hooked.
Cut the metal, bolt up the V, plug in your RTL-SDR, and let your first NOAA image roll in. When you are ready for the next challenge, check out more antenna and SDR projects right here on Broken Signal.