TL;DR — Raspberry Pi WSPR Beacon in an Afternoon
- Core idea: Use your Raspberry Pi GPIO pin as a low-power WSPR transmitter for HF propagation testing.
- Why it matters: You get real, logged reports from stations worldwide that show how your antenna actually performs.
- Key benefit: No dedicated radio hardware needed, just a Pi, low-pass filter, and a band-specific antenna.
- Who it's for: Licensed hams who enjoy tinkering, antenna experiments, and seeing their call sign pop up on WSPRnet.
WSPR turns your station into a tiny digital beacon that quietly reports how well your signal gets out.
With a Raspberry Pi, a low-pass filter, and a resonant antenna, you can build a low-power WSPR transmitter
that runs for days and shows real-world propagation on a live map.
WSPR (Weak Signal Propagation Reporter) is a digital mode created by Joe Taylor, K1JT, for measuring propagation paths
using very low power. A single WSPR transmission carries your call sign, grid locator, and power level, and takes about
two minutes to send. On the receive side, stations all over the world decode and upload your spots to WSPRnet.
The clever part is that a Raspberry Pi can generate RF directly on one of its GPIO pins using software such as WsprryPi.
With a proper low-pass filter and a safe antenna, you get a tiny standalone beacon you can park on a band and use to compare
antennas, test band openings, or just see how far a few milliwatts will go.
What is WSPR and why use a Raspberry Pi?
WSPR is designed to be decoded at signal levels far below the noise. That makes it perfect for antenna and propagation
testing. Instead of calling CQ, you let the Pi send a beacon every few minutes while you check the spots map at
WSPRnet.org.
A Raspberry Pi is ideal for this job: it runs 24/7, sips power, has built-in networking for NTP time sync, and can
generate stable RF on GPIO4 (pin 7) with the right software. You still need a low-pass filter and a band-appropriate
antenna, but you don’t need a full HF rig dedicated to beacon duty.
Typical Raspberry Pi WSPR Beacon Specs
| Metric |
Value |
Why It Matters |
| RF output power |
About 5–10 mW into 50 Ω |
Enough for thousands of miles of coverage while staying very low power. |
| Spot count in 24 hours |
Dozens to hundreds of reports |
Gives a dense picture of band conditions and antenna performance over time. |
Step-by-step: turn your Raspberry Pi into a WSPR beacon
Below is the basic flow I use when setting up a Pi based WSPR transmitter.
I am assuming you already have Raspberry Pi OS installed, the Pi is on your
network (SSH or local screen), and you have a valid amateur radio license
for the band you plan to use. If you are brand new to radio, take a look at
some material in the Getting Started section first.
-
Wire GPIO4 to an RF connector
The WsprryPi software uses GPIO4 as the RF output.
- On the 40 pin header, GPIO4 is physical pin 7.
- Use any handy ground pin. I like pin 9 because it sits right next to pin 7.
- Mount an SMA bulkhead on the Pi case (or a small project box) so you can attach a coax jumper to your filter and antenna.
Keep the leads between GPIO4, ground, and the SMA as short and neat as you reasonably can.
This is not a lab grade RF chain, but there is no reason to make it worse than it has to be.
-
Update the Pi and install git
Open a terminal or SSH session and bring the system up to date:
sudo apt-get update
sudo apt-get upgrade -y
Then install git so you can pull the WsprryPi source:
sudo apt-get install -y git
-
Download the WsprryPi source from GitHub
Clone the repository that contains the WSPR beacon code:
cd ~
git clone https://github.com/sjames/WsprryPi.git
cd WsprryPi
After this, you should be sitting in the WsprryPi directory with a Makefile and source files.
-
Build the WsprryPi binary
From inside the WsprryPi folder, run:
make
On most recent Raspberry Pi OS images this completes cleanly and leaves you with a wspr binary in the directory.
If you do hit a compile error, read the exact message, then check the WsprryPi GitHub issues page.
The maintainer usually notes any quick one line fixes needed for newer compilers.
-
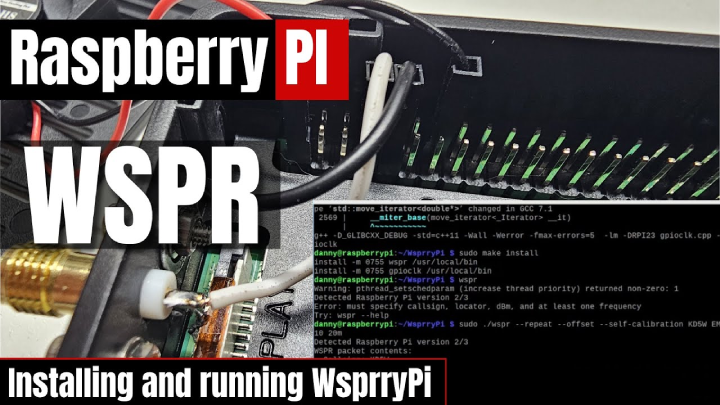
Install the binary system wide
Once make finishes without errors, install it:
sudo make install
This drops the wspr command into a standard location such as /usr/local/bin so you can call it from anywhere.
You can confirm the install with:
wspr --help
If you see usage text instead of a command not found error, the install worked.
-
Hook up the low pass filter and antenna
The Pi generates a square wave, which is full of harmonics. That is why a low pass filter is not optional.
- Connect GPIO4 and ground from your SMA (or header breakout) into a low pass filter built for your chosen band.
- From the output of the filter, run coax to a 50 ohm antenna cut for that band (for example a 20 m dipole or vertical).
- Keep coax runs short at first. Long runs and lossy feedline will make a few milliwatts disappear fast.
-
Make sure time sync and callsign info are ready
WSPR time slots are very strict. Your Pi needs correct time.
- Make sure the Pi has internet access so NTP can sync the clock.
- Have your call sign and 4 or 6 digit grid locator handy (for example, EM73 or EM73xx).
- Decide which band you want to start on. WsprryPi uses the band name as a number, such as
20m or 10m.
-
Run your first WSPR transmission
A typical test command looks like this (all on one line):
sudo wspr <CALLSIGN> <GRID> 10m
Example with real values:
sudo wspr N0ABC EM73 10m
That will send a small number of WSPR transmissions on 10 m and then stop. It is a good smoke test to confirm that:
- The command runs without errors.
- Your low pass filter and antenna are connected correctly.
- You see a carrier on a nearby receiver or SDR when the slot starts.
-
Set up a continuous beacon on multiple bands
Once the one off test works, you can let the Pi beacon until you tell it to stop.
WsprryPi lets you specify several bands in one command. For example:
sudo wspr -r N0ABC EM73 40m 20m 10m
Where:
-r tells it to repeat transmissions instead of stopping after a few cycles.N0ABC is your call sign.EM73 is your grid locator.40m 20m 10m are the bands you want to cycle through.
Let this run for a few hours to start with. When you are done, press Ctrl + C to stop the beacon.
-
Check your spots on WSPRnet
After at least a few transmissions, go to WSPRnet.org and:
- Choose the band you used.
- Set the mode to WSPR.
- Enter your call sign in the callsign field.
- Pick the time window you want to look at, such as the last 6 or 24 hours.
Click update and you should see a list of receiving stations and a map.
That view becomes your antenna performance report card. Change antennas, locations, or bands,
rerun the beacon, and compare the maps.
How the Raspberry Pi approach compares to a “real” transmitter
You can run WSPR from a full HF radio and a PC with WSJT-X, and many operators do exactly that.
The Pi beacon is a different tool. It’s closer to a small, always-on test instrument you can dedicate
to antenna experiments while you keep your main rig free for contacts.
- Pi beacon is ultra low power and cheap to leave running 24/7.
- Full HF rig gives cleaner RF and more power, but ties up a radio and draws more current.
- Standalone Pi setup is great for remote antenna sites or testing different bands over long periods.
Checking your coverage on WSPRnet
Once your beacon is on the air, let it run for at least a few hours. A full 24-hour window is even better,
since you’ll see how propagation changes between day and night on your chosen bands.
To see who heard you, go to WSPRnet.org and use the database view:
select the band you’re using, set the mode to WSPR, enter your call sign, and choose a time range.
Click update and you’ll get a list and a map of receiving stations reporting your signal. It’s a very visual way
to see what that new dipole or vertical is actually doing compared to whatever you used before.
Practical tips and safety notes
Even though the Pi beacon runs at just a few milliwatts, it’s still RF, and you’re still responsible for operating
legally and cleanly. Treat this like any other transmitter: follow the band plan, identify correctly, and don’t
spray harmonics all over the spectrum.
- Always use a proper low-pass filter between GPIO4 and your antenna to knock down harmonics.
- Double-check your callsign, grid locator, power level, and band choices before letting it run unattended.
- Keep the Pi, cabling, and any filters away from metal cases and other gear that might detune your antenna.
Is a Raspberry Pi WSPR beacon right for your station?
If you like tinkering and you’re curious how far your antennas really reach, a Pi-based WSPR beacon is hard to beat.
It’s cheap, quiet, and does one job very well: showing you real-world propagation from your station with almost no effort
once it’s set up.
- Use it to compare antennas, feedline runs, and locations over days and weeks.
- Let it run in the background while you focus on other parts of the hobby.
- Combine your beacon data with tools like SDR receivers or SDR projects for deeper analysis.
Ready to build your WSPR beacon? Grab a Raspberry Pi using our affiliate link:
View Raspberry Pi deals on eBay
.
Every purchase helps support more ham radio projects like this.